- (https://b-ark.ca/ksKKwg)
I’m riding in the 2025 Enbridge Tour Alberta for Cancer, raising money for the Alberta Cancer Foundation, and have so far raised $2,744, exceeding my $2,500 goal and surpassing my 2024 effort!
Help me by donating here
And remember, by donating you earn a chance to win a pair of hand knitted socks!
Fun with Naan
If anyone’s had good quality Indian food, they’ve probably experienced Naan, a classic Indian leavened flatbread. Pair it with a good curry and there’s just nothing like it… and, unfortunately, it’s also incredibly difficult to replicate at home. Traditionally, Naan is baked in something called a Tandoor, a vertical, clay oven heated by charcoal which can reach upwards of 900F! To bake naan, the dough is flattened into a teardrop shape and then stuck to the inside wall of the oven, where it bakes for mere minutes before coming out piping hot.
Of course, no one is going to have a Tandoor at home, and so replicating Naan at home is basically impossible. However, you can get pretty close:
I got the recipe from a lovely woman named Manjula. I don’t actually know who she is, but she has a website, and apparently posts videos on youtube, including this Naan recipe. Now, obviously the key to good Naan is blazing hot temperatures, and it turns out the best way to achieve this at home is with a baking stone. If you don’t have one, get one. You’ll love it, trust me. For pizza, there’s nothing like it, and it can also be used for artisnal breads, and as it turns out, Naan, too.
As for the recipe, it’s pretty straightforward (BTW, if you want the volumetric measurements, just check out the video):
1 tsp active dry yeast
1 tsp sugar
170g warm water
300g flour
1 tsp salt
pinch baking soda
2 tbsp oil
2 1/2 tbsp plain yogurt
The following directions are my method of putting the dough together, but really, there’s no bad way. Just make sure you activate the yeast before doing anything else. Anyway, here’s how I put it together:
- Combine the water, sugar, and yeast, whisk, and set aside to activate.
- Combine the dry incredients and whisk together to combine.
- Dump out the dry onto the counter and make a nice, big well.
- Put the yeast mixture, oil, and yogurt into the well and combine with a fork.
- Gradually incorporate flour with a fork until it comes together as a dough.
- Kneed for a minute or so, just a few strokes. Note, the dough will be pretty wet, making this process a bit… messy. Manjula suggests putting a little oil on your hands.
- Let the dough rise 3-4 hours. Note, I usually rise an hour, degass, then rise one more hour. I’m impatient.
To bake:
- Put the stone in the oven and turn it up to 500 degrees, letting it preheat for a good 30 minutes, then switch the oven to the high broiler. Note: never put a cold stone in a hot oven!
- Divide the dough into 4-6 pieces, rolling into balls and dusting with flour.
- Baking in batches, flatten the pieces to 1/4” thickness (feel free to roll, but I like to use my hands). Then for each piece, dampen your hands, toss the dough between them, and then place the piece on the stone. Optionally, prick with a fork, otherwise they tend to inflate. A lot.
- Bake for 2-3 minutes, until spotty brown.
- Once done, take them out and brush with melted butter or ghee (clarified butter).
Look like a lot of effort? Trust me, it’s not so bad. And man… it’s worth it.
Yes, More With The Bread
Well, I just keep refining this bread recipe. The second time, Lenore thought she could detect a strange aftertaste in the bread. It wasn’t clear if it was a lingering alcohol smell, or a by-product of stale whole wheat flour, and so I decided to run a couple experiments. Both turned out frickin’ fantastic, if I do say so myself.
Both of these breads were made using a white flour poolish made as follows:
- 10 tbsp white flour
- 10 tbsp water
- 1/4 tsp yeast.
Now, if you’ve read any of my other posts, you’ll know this mixture is a little different. First, there’s more flour. This is mainly because the white flour absorbs less liquid, and so the poolish can tolerate more. You’ll also note there’s less yeast. I was worried that the first poolish got a little alcohol-y, generating the off flavour Lenore noticed, and so I decreased the amount of yeast in the poolish, and conversely increased the yeast content in the main bread. Interestingly, this poolish formula generated much greater gluten development. As in, the blend went from batter-like when I mixed it, to an almost stretchy, rubbery texture. It was pretty remarkable, actually, and possibly a consequence of the decreased yeast (if flour ferments too long/much, the gluten can actually begin to break down, a phenomenon known as over-proofing).
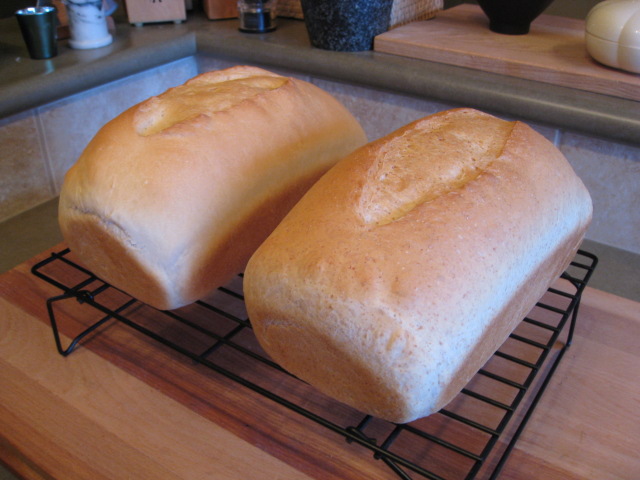
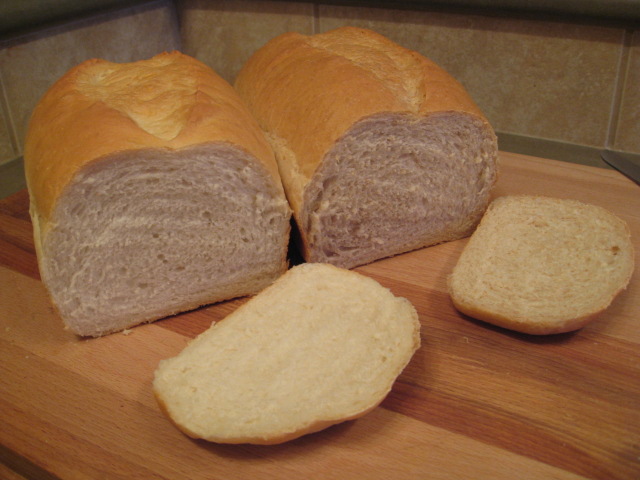
As for technique, I dialed back the bake time to thirty minutes, and made use of a thermometer to test for doneness (they need to hit 200F at the center). In addition, as you can see, I scored the tops of the loaves prior to baking, partly because it helps jack up the oven spring by breaking tension in the top of the loaf, and partly because I think it just looks nice. :)
Other than that, these loaves are essentially the same as attempt number two. The loaf on the left is straight white bread, a test to see if the wheat flour was the cause of the flavour Lenore detected. The loaf on the right is probably 40% WW (I forgot to jack up the WW in the main recipe to compensate for the white flour poolish, but… so it goes).
As for impressions, as you can see, the crumb is pleasantly tighter and more even than my second loaf, a result, I suspect, of the higher gluten development thanks to the poolish. The bread is much more moist and soft, almost the texture of a store-bought french bread. In conclusion: hands down, my best attempts yet.
Oh, and the funky taste? No sign of it! Must’ve been the funky flour after all.
Toot Frickin Toot
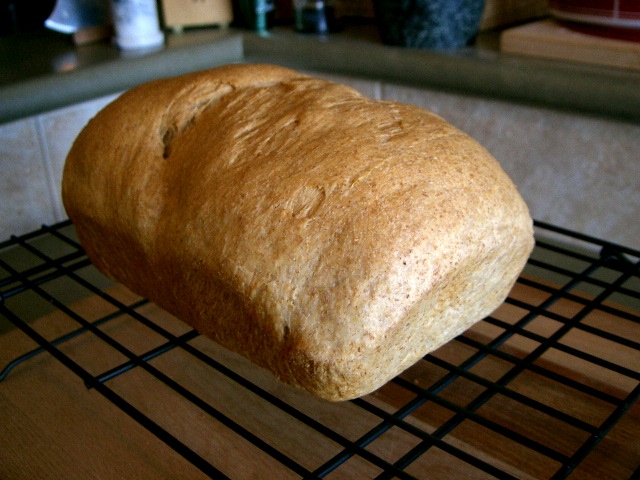
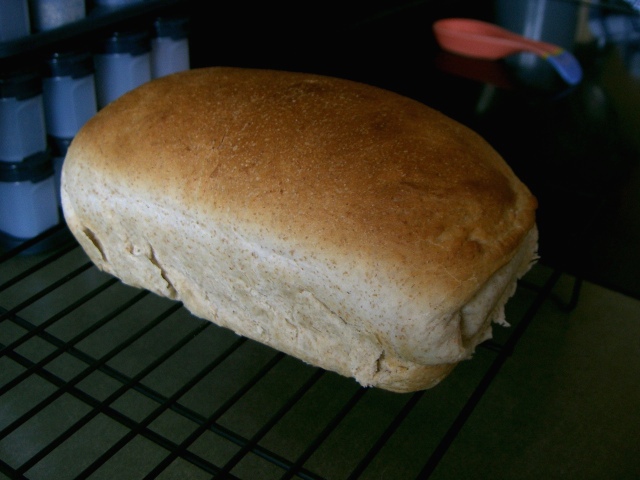
Well sir, I’ve got me a bread recipe. I decided to take a second crack at the Amish Bread recipe. Incidentally, my entire goal, here, is to create a bread suitable for sandwiches, toast, and so forth. Basically, I’m looking to replace our grocery store bread with homemade bread. I hope. :) Anyway here’s the result:
Notice the gorgeous, light brown colour, and a fantastic crumb, light and airy. And the crust is crunchy, chewy, and just plain delicious.
Now, I ended up making a couple of key alterations to this recipe to get this result. The first was to cut down on the sugar. There’s just a tablespoon in this batch, and the level of sweetness is just right (for me, anyway… this is something you can easily play around with to get something you like).
But the second, and I think most important part, was the use of something called a Poolish, or pre-ferment. But before I explain that, why not dive into a little bit of the science behind the proofing of bread?
Of course, everyone knows that yeast acts as a leavening agent in breads, generating lift by creating carbon dioxide while metabolizing the starches in the flour. Most people also know that yeast provides a flavour element (after all, who doesn’t recognize the yeasty taste and smell of fresh bread?). But what many people don’t realize is that, when yeast metabolizes starch, it produces as a by-product, along with CO2, a wide range of flavour compounds, due to the breakdown of starches, proteins, and fats into shorter chain molecules, such as sugars and amino acids. And interestingly, yeast isn’t the only game in town during this process. Bacteria, naturally present in the various ingredients we use, also assist in this process. Unfortunately, yeast likes to suck up the sugar as fast as it can find it, and so the bacteria don’t have any chance to do their thing. So if you want really great flavour, you need to give the bacteria more time to work, while avoiding the alcohol flavour caused by over-proofing.
But what can you do? Well, there’s basically two approaches that work:
The first is a cold rise. In this case, you create your dough like normal, but instead of rising it in a nice, warm place, you pop it in the fridge or some other cool place. This slows the yeast down, and gives the bacteria lots of time to create flavour compounds in the bread. Normally, you’d do this by proofing the bread in the fridge overnight, and then baking the next day. But, of course, that means you need to do most of the work the night before. Incidentally, this is how most french breads are made, and as everyone knows, french bread tastes yummy.
The second option, and the one I used, is called a poolish, or pre-ferment. A poolish is a combination of some fraction of a recipe’s flour, water, and yeast, that’s combined and left for a long period of time (I give it a good 8-12 hours) to ferment. This gives the yeast and bacteria a nice, long time to sit there, chewing away at the flour. Then, when you’re ready to put the bread together, you combine the poolish with the other wet ingredients, and build the bread as you normally would. The big advantage, here, is that creating a poolish takes all of five minutes, and the result is a ton of flavour. Additionally, the poolish contributes a large amount of liberated gluten to the bread, which means you can get away with working the dough for a shorter period of time.
So, all that finally said, here’s the formula I used:
For the poolish:
- 10 tbsp water
- 1/2 tsp yeast
- 6 tbsp flour
Just mix this together into a nice slurry, cover it up, and leave it alone overnight. Note, I used whole wheat flour for the poolish, thinking it might create a more complex flavour (I have no idea if this is true or not :). But this did mean I had to jack up the amount of water to get the right texture (I prefer something similar to pancake batter). Consequently, you might have to adjust the amount of flour/water used to get something you like. Just remember to adjust the amounts in the main bread recipe accordingly.
For the main bread:
- 2 1/4 cups bread flour
- 1/4 cup canola oil
- 1/2 tsp active dry yeast
- 1 tbsp white sugar
- 1/2 teaspoon salt
- 1/4 cup warm water
- poolish
To make the dough, activate the yeast with the water and sugar and set aside. Then combine flour and salt, and once ready, add the yeast mixture, oil, and the poolish, and need like crazy! Rise until double, shape the loaf, proof it, then bake until it’s nice and crusty (it took my loaf close to 40 minutes to get properly finished up).
Incidentally, I once again used a blend of 50% white and 50% whole wheat flours in this bread. In addition, I used a Pyrex baking dish and found that, my dough being wetter, I had to bake the loaf on the bottom rack to ensure even cooking and a nice overall crust.
Oh, and one last lesson that I learned: one habit I’ve picked up from making pizza is to apply oil to the ball of dough prior to rising. This keeps the dough moist and ensures it doesn’t stick to the sides of the bowl. But, if you took a look at that loaf shaping video, you know that in order to shape a sandwich loaf, you need to be able to fold and roll the dough into shape, and the oil has the nasty side-effect of preventing the dough from sticking to itself. Consequently, during the initial proofing step, this resulted in a large CO2 bubble forming near the surface of my loaf, thanks to a gap between two of the oiled layers of dough. So, the lesson: don’t oil your dough! Just lightly dust the inside of the bowl with flour, and otherwise don’t worry about it (you’re gonna manhandle the dough, anyway, so it’s harmless if it sticks to the bowl a bit).
Back On The Horse
So a while back, I made my first couple attempts at making bread. It suffices to say, it didn’t go terribly well… mostly because I’m ridiculously impatient, and so I never really let the loaves complete their second rise before popping them in the oven. End result: bricks. Soft bricks, granted, but bricks all the same.
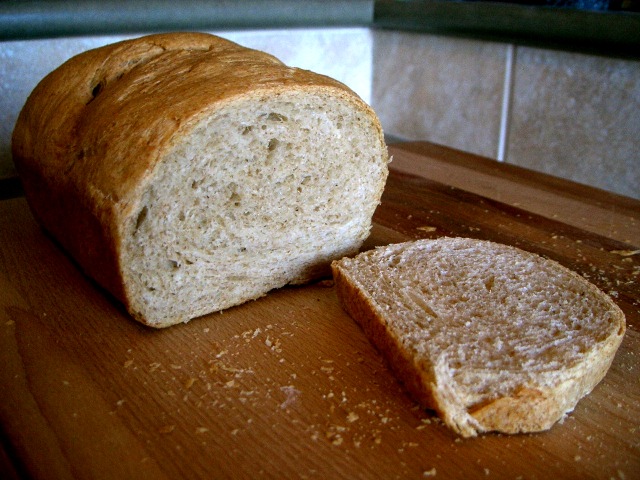
Well, I took the day off, today, and figured, hey, it’s time to jump back on the horse, darnit! Well, that and I was anticipating lunch, and there wasn’t much else to eat. So, maybe four hours later, voila, I have this:
Turned out pretty well, eh? Nice crumb, relatively light, and tasty! I ended up using the following recipe (from here, though it’s originally from here):
Amish Bread
- 2 3/4 cups bread flour
- 1/4 cup canola oil
- 1 teaspoon active dry yeast
- 1/4 cup white sugar
- 1/2 teaspoon salt
- 3/4 cup+ 2T warm water
Just combine the water, sugar, and yeast, and let it stand for around five minutes to activate. Meanwhile, whisk the flour and salt together, then when the yeast is ready, throw the whole thing together and kneed like crazy (8-10 minutes is good). Then, rise to double, shape it like so, then let it rise a second time (I let it rise until it basically filled the bread pan… though I probably should’ve let it go a bit longer). Then, 20 mintues at 350, and voila! Bread!
Now, a couple notes. First, I actually made mine with 50% whole wheat and 50% white bread flours. You could try 100% WW, but given I wanted to avoid another doughy slab, I stayed on the cautious side. Second, this bread is sweet. Far sweeter than I’d expected (though, if I’d read the comments on the Allrecipes page, I would’ve known this). The next time I make this, I’m gonna dial down the sugar significantly (one commenter suggested just a tablespoon).
Incidentally, the original submitter of the recipe does this up in a breadmaker, and apparently it works quite nicely. Of course, I just did mine by hand (and really by hand, ie no mixer, either), but if you have a breadmaker, go nuts!
Update:
When I pulled the loaf out of the oven, I initially didn’t believe it was fully cooked. But the crust was nice and brown, and the loaf seemed to make a nice, hollow sound when tapped, so I figured it was fine. Turns out I was wrong.
Now, this may be a by-product of the way I make dough. Rather than working in a bowl, I tend to place the dry ingredients on the counter with a well in the center, where I pour in the liquid ingredients. Then, I gradually incorporate wet into dry, keeping the well walls intact, until the dough comes together. The nice thing about this technique is that it’s really easy to control the amount of flour that’s included in the dough. ie, if I want to leave some out, I just don’t work it in, something much more difficult to do in a bowl, it being a more confined space. And this is particularly handy in low-humidity climates like Alberta because really dry flour will absorb more moisture, and so I find I generally need less flour than is called for in a given recipe.
Now, this does mean my doughs tend to be fairly moist, which actually works out really well for bread, as steam is what generates oven spring (the final rise that occurs during the first part of the baking process). However, that does mean that the bread can take a little longer to bake. Apparently I forgot about that. End result: undercooked bread. Doheth!
Oh well, looks like I’ll be taking a second crack at this recipe sooner than I thought!