
Back On The Horse
So a while back, I made my first couple attempts at making bread. It suffices to say, it didn’t go terribly well… mostly because I’m ridiculously impatient, and so I never really let the loaves complete their second rise before popping them in the oven. End result: bricks. Soft bricks, granted, but bricks all the same.
Well, I took the day off, today, and figured, hey, it’s time to jump back on the horse, darnit! Well, that and I was anticipating lunch, and there wasn’t much else to eat. So, maybe four hours later, voila, I have this:
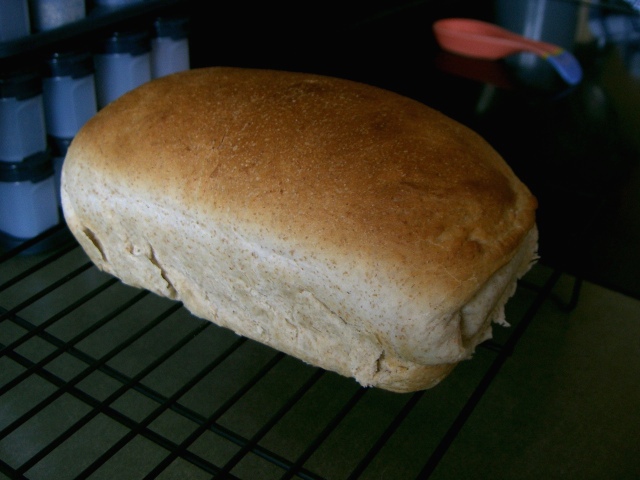

Turned out pretty well, eh? Nice crumb, relatively light, and tasty! I ended up using the following recipe (from here, though it’s originally from here):
Amish Bread
- 2 3/4 cups bread flour
- 1/4 cup canola oil
- 1 teaspoon active dry yeast
- 1/4 cup white sugar
- 1/2 teaspoon salt
- 3/4 cup+ 2T warm water
Just combine the water, sugar, and yeast, and let it stand for around five minutes to activate. Meanwhile, whisk the flour and salt together, then when the yeast is ready, throw the whole thing together and kneed like crazy (8-10 minutes is good). Then, rise to double, shape it like so, then let it rise a second time (I let it rise until it basically filled the bread pan… though I probably should’ve let it go a bit longer). Then, 20 mintues at 350, and voila! Bread!
Now, a couple notes. First, I actually made mine with 50% whole wheat and 50% white bread flours. You could try 100% WW, but given I wanted to avoid another doughy slab, I stayed on the cautious side. Second, this bread is sweet. Far sweeter than I’d expected (though, if I’d read the comments on the Allrecipes page, I would’ve known this). The next time I make this, I’m gonna dial down the sugar significantly (one commenter suggested just a tablespoon).
Incidentally, the original submitter of the recipe does this up in a breadmaker, and apparently it works quite nicely. Of course, I just did mine by hand (and really by hand, ie no mixer, either), but if you have a breadmaker, go nuts!
Update:
When I pulled the loaf out of the oven, I initially didn’t believe it was fully cooked. But the crust was nice and brown, and the loaf seemed to make a nice, hollow sound when tapped, so I figured it was fine. Turns out I was wrong.
Now, this may be a by-product of the way I make dough. Rather than working in a bowl, I tend to place the dry ingredients on the counter with a well in the center, where I pour in the liquid ingredients. Then, I gradually incorporate wet into dry, keeping the well walls intact, until the dough comes together. The nice thing about this technique is that it’s really easy to control the amount of flour that’s included in the dough. ie, if I want to leave some out, I just don’t work it in, something much more difficult to do in a bowl, it being a more confined space. And this is particularly handy in low-humidity climates like Alberta because really dry flour will absorb more moisture, and so I find I generally need less flour than is called for in a given recipe.
Now, this does mean my doughs tend to be fairly moist, which actually works out really well for bread, as steam is what generates oven spring (the final rise that occurs during the first part of the baking process). However, that does mean that the bread can take a little longer to bake. Apparently I forgot about that. End result: undercooked bread. Doheth!
Oh well, looks like I’ll be taking a second crack at this recipe sooner than I thought!
-
{% for webmention in webmentions %}
-
{{ webmention.content }}
{% endfor %}
No bookmarks were found.
{% endif %}Likes
-
{% for webmention in webmentions %}
-
{% if webmention.author %} {% capture author_id %} {% if webmention.author.photo %}{% endif %}{% endif %} {% if webmention.author.name %} {% endif %} {% endcapture %} {% if webmention.author.url %} {{ author_id }} {% else %} {{ author_id }} {% endif %}
{% endfor %}
-
{% for webmention in webmentions %}
-
{{ webmention.content }}
{% endfor %}
No links were found.
{% endif %}Replies
-
{% for webmention in webmentions %}
-
{% if webmention.author %} {% capture author_id %} {% if webmention.author.photo %}{% endif %}{% if webmention.content %} {{ webmention.content }} {% else %} {{ webmention.title }} {% endif %}
{% endfor %}
-
{% for webmention in webmentions %}
-
{% if webmention.author %} {% endif %}{% if webmention.content %} {{ webmention.content }} {% else %} {{ webmention.title }} {% endif %}
{% endfor %}
-
{% for webmention in webmentions %}
-
No reposts were found.
{% endif %}-
{% for webmention in webmentions %}
- {% endfor %}
No RSVPs were found.
{% endif %}-
{% for webmention in webmentions %}
-
{% if webmention.author %} {% endif %} {% if webmention.content %} {{ webmention.content }} {% else %} {{ webmention.title }} {% endif %}
{% endfor %}
No webmentions were found.
{% endif %}