
Toot Frickin Toot
Well sir, I’ve got me a bread recipe. I decided to take a second crack at the Amish Bread recipe. Incidentally, my entire goal, here, is to create a bread suitable for sandwiches, toast, and so forth. Basically, I’m looking to replace our grocery store bread with homemade bread. I hope. :) Anyway here’s the result:
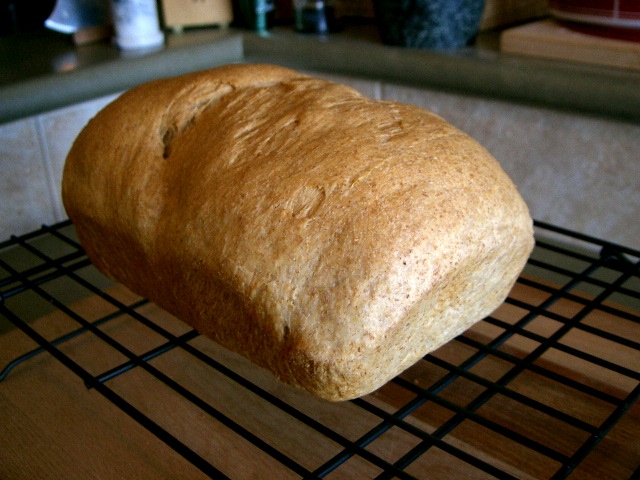
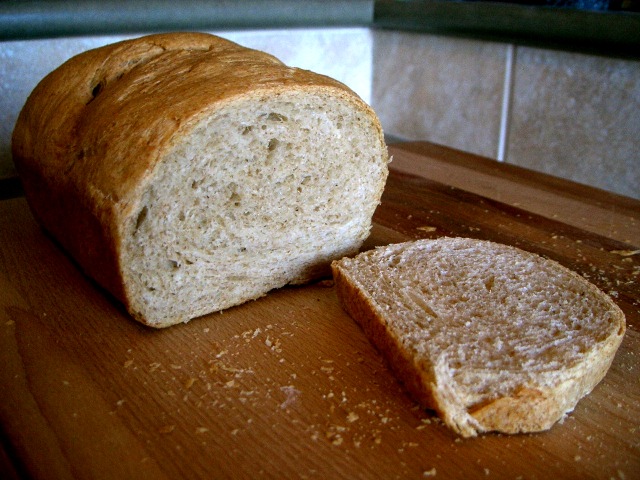
Notice the gorgeous, light brown colour, and a fantastic crumb, light and airy. And the crust is crunchy, chewy, and just plain delicious.
Now, I ended up making a couple of key alterations to this recipe to get this result. The first was to cut down on the sugar. There’s just a tablespoon in this batch, and the level of sweetness is just right (for me, anyway… this is something you can easily play around with to get something you like).
But the second, and I think most important part, was the use of something called a Poolish, or pre-ferment. But before I explain that, why not dive into a little bit of the science behind the proofing of bread?
Of course, everyone knows that yeast acts as a leavening agent in breads, generating lift by creating carbon dioxide while metabolizing the starches in the flour. Most people also know that yeast provides a flavour element (after all, who doesn’t recognize the yeasty taste and smell of fresh bread?). But what many people don’t realize is that, when yeast metabolizes starch, it produces as a by-product, along with CO2, a wide range of flavour compounds, due to the breakdown of starches, proteins, and fats into shorter chain molecules, such as sugars and amino acids. And interestingly, yeast isn’t the only game in town during this process. Bacteria, naturally present in the various ingredients we use, also assist in this process. Unfortunately, yeast likes to suck up the sugar as fast as it can find it, and so the bacteria don’t have any chance to do their thing. So if you want really great flavour, you need to give the bacteria more time to work, while avoiding the alcohol flavour caused by over-proofing.
But what can you do? Well, there’s basically two approaches that work:
The first is a cold rise. In this case, you create your dough like normal, but instead of rising it in a nice, warm place, you pop it in the fridge or some other cool place. This slows the yeast down, and gives the bacteria lots of time to create flavour compounds in the bread. Normally, you’d do this by proofing the bread in the fridge overnight, and then baking the next day. But, of course, that means you need to do most of the work the night before. Incidentally, this is how most french breads are made, and as everyone knows, french bread tastes yummy.
The second option, and the one I used, is called a poolish, or pre-ferment. A poolish is a combination of some fraction of a recipe’s flour, water, and yeast, that’s combined and left for a long period of time (I give it a good 8-12 hours) to ferment. This gives the yeast and bacteria a nice, long time to sit there, chewing away at the flour. Then, when you’re ready to put the bread together, you combine the poolish with the other wet ingredients, and build the bread as you normally would. The big advantage, here, is that creating a poolish takes all of five minutes, and the result is a ton of flavour. Additionally, the poolish contributes a large amount of liberated gluten to the bread, which means you can get away with working the dough for a shorter period of time.
So, all that finally said, here’s the formula I used:
For the poolish:
- 10 tbsp water
- 1/2 tsp yeast
- 6 tbsp flour
Just mix this together into a nice slurry, cover it up, and leave it alone overnight. Note, I used whole wheat flour for the poolish, thinking it might create a more complex flavour (I have no idea if this is true or not :). But this did mean I had to jack up the amount of water to get the right texture (I prefer something similar to pancake batter). Consequently, you might have to adjust the amount of flour/water used to get something you like. Just remember to adjust the amounts in the main bread recipe accordingly.
For the main bread:
- 2 1/4 cups bread flour
- 1/4 cup canola oil
- 1/2 tsp active dry yeast
- 1 tbsp white sugar
- 1/2 teaspoon salt
- 1/4 cup warm water
- poolish
To make the dough, activate the yeast with the water and sugar and set aside. Then combine flour and salt, and once ready, add the yeast mixture, oil, and the poolish, and need like crazy! Rise until double, shape the loaf, proof it, then bake until it’s nice and crusty (it took my loaf close to 40 minutes to get properly finished up).
Incidentally, I once again used a blend of 50% white and 50% whole wheat flours in this bread. In addition, I used a Pyrex baking dish and found that, my dough being wetter, I had to bake the loaf on the bottom rack to ensure even cooking and a nice overall crust.
Oh, and one last lesson that I learned: one habit I’ve picked up from making pizza is to apply oil to the ball of dough prior to rising. This keeps the dough moist and ensures it doesn’t stick to the sides of the bowl. But, if you took a look at that loaf shaping video, you know that in order to shape a sandwich loaf, you need to be able to fold and roll the dough into shape, and the oil has the nasty side-effect of preventing the dough from sticking to itself. Consequently, during the initial proofing step, this resulted in a large CO2 bubble forming near the surface of my loaf, thanks to a gap between two of the oiled layers of dough. So, the lesson: don’t oil your dough! Just lightly dust the inside of the bowl with flour, and otherwise don’t worry about it (you’re gonna manhandle the dough, anyway, so it’s harmless if it sticks to the bowl a bit).
-
{% for webmention in webmentions %}
-
{{ webmention.content }}
{% endfor %}
No bookmarks were found.
{% endif %}Likes
-
{% for webmention in webmentions %}
-
{% if webmention.author %} {% capture author_id %} {% if webmention.author.photo %}{% endif %}{% endif %} {% if webmention.author.name %} {% endif %} {% endcapture %} {% if webmention.author.url %} {{ author_id }} {% else %} {{ author_id }} {% endif %}
{% endfor %}
-
{% for webmention in webmentions %}
-
{{ webmention.content }}
{% endfor %}
No links were found.
{% endif %}Replies
-
{% for webmention in webmentions %}
-
{% if webmention.author %} {% capture author_id %} {% if webmention.author.photo %}{% endif %}{% if webmention.content %} {{ webmention.content }} {% else %} {{ webmention.title }} {% endif %}
{% endfor %}
-
{% for webmention in webmentions %}
-
{% if webmention.author %} {% endif %}{% if webmention.content %} {{ webmention.content }} {% else %} {{ webmention.title }} {% endif %}
{% endfor %}
-
{% for webmention in webmentions %}
-
No reposts were found.
{% endif %}-
{% for webmention in webmentions %}
- {% endfor %}
No RSVPs were found.
{% endif %}-
{% for webmention in webmentions %}
-
{% if webmention.author %} {% endif %} {% if webmention.content %} {{ webmention.content }} {% else %} {{ webmention.title }} {% endif %}
{% endfor %}
No webmentions were found.
{% endif %}