
Handwired Alpha - Supplies, components, and equipment
Supplies
This keyboard is my very first electronics project. Prior to building Alpha, the only soldering I’ve done was to make the odd custom audio cable. As a result, I was… well, literally ill-equipped to take on his project, which required some serious investment.
Here are some of the essentials I picked up. All part numbers can be found on Digikey, which I used as my primary electronics supplier:
- Soldering Iron (243-1156-ND)
- Soldering Iron Stand (243-1156-ND)
- Hemostat (243-1168-ND)
- Multimeter (MN35-ND)
- Desolder Braid (243-1185-ND)
- Desolder Pump (243-1183-ND)
- Lead bending tool (1568-1132-ND)
- Fume absorber (243-1318-ND)
In addition, I took advantage of a cutting mat that was already in our possession as a work surface.
I also needed some consumables for assembly:
- Magnet Wire (1568-1088-ND)
- Solder (RASW.0201OZ-ND)
A couple of things to note, here.
First, I used magnet wire for the assembly. This was a very good choice. Magnet wire has a couple of incredibly useful properties:
- It is coated with an insulation that burns off with a hot soldering iron and a little solder. This meant no stripping of insulation (except for circumstances where I really wanted to avoid overheating). I could just solder directly, confident that there wouldn’t be unexpected shorts.
- Because it’s solid core wire and not stranded, it can be shaped easily. In the final build you can see how I’ve arranged the wire into clean right angles that would’ve been impossible had I used insulated, stranded wire.
Second, I opted for leaded 63/37 rosin activated solder. This stuff melts clean, freezes fast and consistently, and is generally just very easy to work with.
Components
Just to review, a hand wired keyboard is built of a few essential parts that you have to build or source, including:
- Switches - you gotta press something
- Keycaps - no one wants to just press a switch
- Case - everything’s gotta go in something
- The keyboard controller - so the switches have something to talk to
- Stabilizers - so your spacebar isn’t wobbly
- Diodes - to ensure multiple key presses don’t confuse the controller
- Hardware - you gotta piece that case together with something
Obviously a lot of the nuance in a build is selecting these parts so in the following sections I’ll go over those choices.
Switch selection
Probably the two most important parts decisions when building a keyboard are the switches and the keycaps.
In the case of the former, the best thing you can do is pick up a switch tester, which is a little selection of switches mounted in an acrylic block which allows you to feel out which switches might be best for you.
To narrow it down it’s important to understand the three main classes of switch: linear, tactile, and clicky. All mechanical switches actuate part way through the press, which allows the typist to register a key press without bottoming the key out.
A linear switch provides no explicit tactile feedback during the press. Instead, you just feel some additional resistance as the spring in the switch compresses.
A tactile switch includes the feeling of a “bump” on the way down–a brief increase of resistance followed by a linear-style press through to bottoming out.
A clicky switch behaves like a tactile switch, but includes an audible click to indicate the switch has actuated.
Among these classes things vary widely, from spring weight to tactile bump intensity and click loudness. There’s a lot to choose from!
Since I was building a keyboard for office use, I wanted to avoid clicky switches. But I do appreciate some amount of tactile feedback. Consequently, I decided to buy a KBDfans tactile switch tester.
Once the tester arrived, I eventually settled on the Kailh Hako Violet switch, which is a fairly light switch with a nice, light, tactile bump.
Keycap selection
Keycaps are an interesting challenge to choose. I won’t go too deep into the nuances, as there’s many of other resources out there that explain the variables, but in broad strokes you have to choose between keycap materials (ABS or PBT), printing method (laser etched, dye sublimated, or double shot), key profile (uh.. lots), key profile, and board compatibility.
The material tends to dictate the general feel of the keycap.
The printing method affects how well the keys wear over time.
Key profile is the shape of the keycap. Many mechanical keyboards include sculpted key profiles, which change row to row and create a curved overall shape to the board. Others (in particular the DSA profile) are flat.
Board compatibility is a function of key layout. For example, my layout includes a 1.75u shift (the standard square keycap is 1u all other keys are measured as a ratio of that base size), which is somewhat unusual. As a result, I needed a keycap set that included a shift key of that size.
And, of course, one can’t discount cost.
In my case, my oddball key layout immediately forced me to select DSA profile caps. Why? Well, because my layout had keys in unusual rows (e.g., the arrow keys on the bottom row), sculpted keycaps would’ve resulted in a weird, inconsistent profile, since the keys on my board would be in the wrong place relative to the normal profile for the caps.
Once I was forced to DSA caps, my options were a lot more limited.
On top of that, some of my key size selections (like the 1.75u shift) limited options further.
Factor in cost (keycaps can get enormously expensive!) and I ended up selecting the KBDfans DSA Lazer Etched 145 key blue and white cap set.
They’re not the highest end caps in the world, and the legends will wear off over time, but they’re still a pretty darn nice set!
Controller
To be honest, controller selection was dictated by two factors:
- I wanted an ATmega32u4 CPU, as that’s very well supported by the open source QMK keyboard firmware.
- I was ordering on Digikey.
That left me with a single choice: The Adafruit Itsybitsy 5V (1528-2501-ND).
This device worked out great! It has a decent number of pins (23) at a reasonable price point. The only tricky thing was finding a useful pinout using the AVR pin names. Fortunately, the 40percent.club website had a pin mapping, which I’ve happy cribbed and included here:
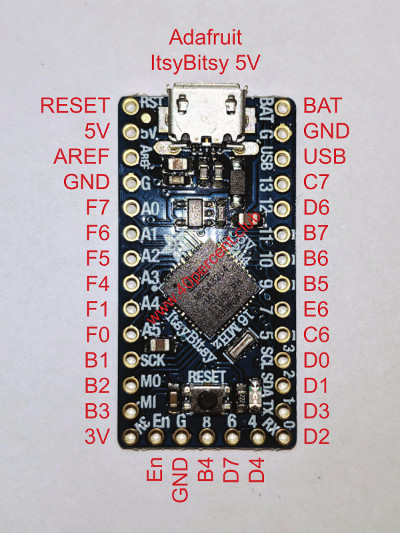
With that the rest was a piece of cake.
Case construction
As I mentioned previously, a sandwich-style case is composed of two pieces: the switch plate and the backing plate (and normally a couple of middle layers, but I skipped those).
I opted for 1.5mm brushed stainless steel, laser cut by Underpressure Welding. They did a wonderful job, though I should’ve asked them not to sand off the burrs that resulted from the cut, as the bottom plate ended up with some unsightly marks. Fortunately, the top plate was untouched, and I manually removed the burrs using a metal file.
The plan for the case was designed using the swillkb plate and case builder.
The case is then assembled using nickle plated hex standoffs and screws. Simple and effective.
As you’ll see later, I also lined the bottom plate with a piece of thin foam, both to protect the switch matrix from shorts, and also to reduce noise.
Other parts
There’s a grab bag of other random parts that I needed to complete this build:
- Screws (H742-ND)
- Standoffs (36-24395-ND)
- Diodes (1N4148FS-ND)
- Micro USB Breakout (1568-1194-ND)
- 14 pin board-to-board mating pins (ED6864-14-ND)
- 14 pin board-to-board mating receptacles (ED4764-14-ND)
- 5 pin board-to-board mating pins (ED6864-05-ND)
- 5 pin board-to-board mating receptacles (ED11158-ND)
- 5 pin USB receptacle - (A26475-ND)
- Foam insulation (EAR1033-ND)
- Feet (KBDfans Anodized CNC Aluminum Feet)
- 3M Command adhesive strips (3M162666-ND)
There’s a lot to buy!
-
{% for webmention in webmentions %}
-
{{ webmention.content }}
{% endfor %}
No bookmarks were found.
{% endif %}Likes
-
{% for webmention in webmentions %}
-
{% if webmention.author %} {% capture author_id %} {% if webmention.author.photo %}{% endif %}{% endif %} {% if webmention.author.name %} {% endif %} {% endcapture %} {% if webmention.author.url %} {{ author_id }} {% else %} {{ author_id }} {% endif %}
{% endfor %}
-
{% for webmention in webmentions %}
-
{{ webmention.content }}
{% endfor %}
No links were found.
{% endif %}Replies
-
{% for webmention in webmentions %}
-
{% if webmention.author %} {% capture author_id %} {% if webmention.author.photo %}{% endif %}{% if webmention.content %} {{ webmention.content }} {% else %} {{ webmention.title }} {% endif %}
{% endfor %}
-
{% for webmention in webmentions %}
-
{% if webmention.author %} {% endif %}{% if webmention.content %} {{ webmention.content }} {% else %} {{ webmention.title }} {% endif %}
{% endfor %}
-
{% for webmention in webmentions %}
-
No reposts were found.
{% endif %}-
{% for webmention in webmentions %}
- {% endfor %}
No RSVPs were found.
{% endif %}-
{% for webmention in webmentions %}
-
{% if webmention.author %} {% endif %} {% if webmention.content %} {{ webmention.content }} {% else %} {{ webmention.title }} {% endif %}
{% endfor %}
No webmentions were found.
{% endif %}