
Handwired Alpha - Design
Key layout
For my first keyboard I wanted to come up with a design that was unique enough to justify a build, but still practical and useful. After seeing an HHKB layout, I also decided I didn’t want to get locked into a traditional rectangular key layout. I wanted something different.
There are a few things about my target use case for this keyboard, and my own typing habits, that informed the layout I chose.
First, this keyboard would be used at work, where I no longer code professionally. Instead, my keyboard is used mostly for writing prose, in the form of email, documents, and so forth. This fact allowed me to sacrifice dedicated function keys and the grave/tilde key, as I knew I wouldn’t be using them heavily.
Second, my typing style has evolved to rely entirely on my left hand to operate the Alt, Control, and Super keys. Those keys on the right side of the keyboard see no use during my normal day to day activities.
Finally, I do tend to use the arrow cluster and page up/down keys a fair bit. I knew I’d want to preserve them in lieu of a true 60% layout.
What I ultimately arrived at is this somewhat peculiar design:
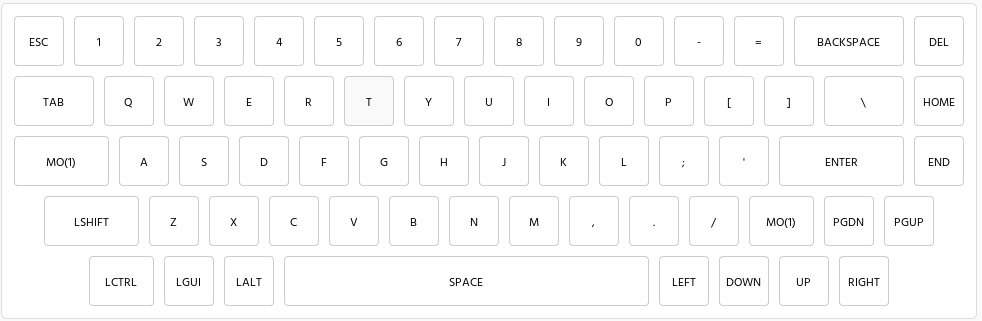
I developed this using the Keyboard Layout Editor, which is an enormously useful tool!
As you can see, by removing the right-hand meta keys I was able to use that space for other keys that I find most useful. In particular, Vim users will recognize the arrow key arrangement, which mirrors the hjkl navigation cluster. I then adjusted the key dimensions to produce a symmetric, tapered profile across the board.
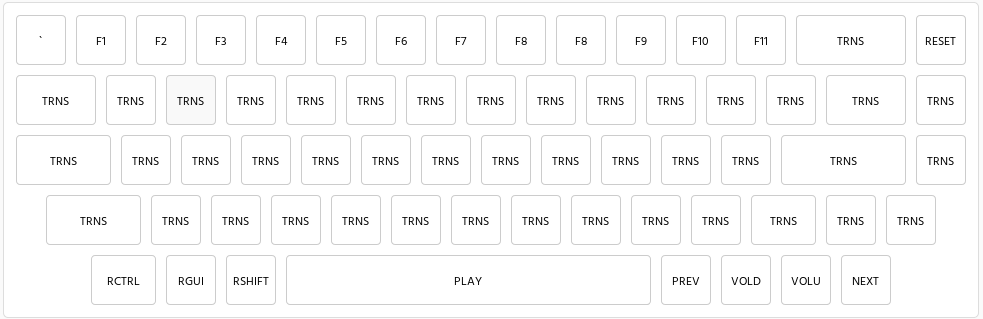
In addition, I’ve defined a layer that includes the function keys, plus some useful media keys1:
In general this has proved mostly successful, though I gotta admit, the left control key positioning is a little tricky to adjust to (I’ve definitely missed it a few times!) and I do miss the F12 key in Linux (which I use to open Guake).
Case
For the case my primary goal was to build something cheap, flexible, and easy to assemble. I knew that meant a sandwich case design, though in the interest of reducing costs, I left out the interior layers, instead opting for an open plate construction. The result is what I charitably think of as an industrial-style look that let’s you catch a glimpse of the guts of the thing.
Hotswappable
I feel the most interesting aspect of this keyboard design is the entirely hot swappable nature of the build. Rather than soldering the matrix directly to the switches, I used Kailh hotswap sockets, which means the switches themselves can be easily swapped out.
In addition (and I have much more mixed feelings about this), the controller is connected to the matrix using a set of low profile board-to-board mating sockets and pins. This means the board can be easily detached from the matrix, which makes it possible to replace it or reuse the board in another project in the future.
Finally, the use of a USB breakout board with a custom made cable allows me to easily remove the case and detach the breakout board without disturbing the rest of the build.
This construction provides a couple of benefits. First, again, it allows repair or replacement of components and so forth, which is nice. However, for this paranoid first timer solderer, it also meant I could avoid soldering directly to delicate components. Other than soldering the headers to the USB breakout board and controller, all other joints involved cheap, replaceable sockets and pins.
In hindsight, I think this was a great design choice, with the exception of the hotswappable controller. As we’ll get to later, that choice resulted in the case not having enough space, due to the height of the combination of controller plus socket plus pins, which meant I had to get taller standoffs to complete the assembly.
-
This image doesn’t actually reflect the final layout, as I ended up mapping Fn-PgUp to Mute, and configured the Esc key to be the QMK Grave-Esc hyper key, among other minor tweaks. ↩
-
{% for webmention in webmentions %}
-
{{ webmention.content }}
{% endfor %}
No bookmarks were found.
{% endif %}Likes
-
{% for webmention in webmentions %}
-
{% if webmention.author %} {% capture author_id %} {% if webmention.author.photo %}{% endif %}{% endif %} {% if webmention.author.name %} {% endif %} {% endcapture %} {% if webmention.author.url %} {{ author_id }} {% else %} {{ author_id }} {% endif %}
{% endfor %}
-
{% for webmention in webmentions %}
-
{{ webmention.content }}
{% endfor %}
No links were found.
{% endif %}Replies
-
{% for webmention in webmentions %}
-
{% if webmention.author %} {% capture author_id %} {% if webmention.author.photo %}{% endif %}{% if webmention.content %} {{ webmention.content }} {% else %} {{ webmention.title }} {% endif %}
{% endfor %}
-
{% for webmention in webmentions %}
-
{% if webmention.author %} {% endif %}{% if webmention.content %} {{ webmention.content }} {% else %} {{ webmention.title }} {% endif %}
{% endfor %}
-
{% for webmention in webmentions %}
-
No reposts were found.
{% endif %}-
{% for webmention in webmentions %}
- {% endfor %}
No RSVPs were found.
{% endif %}-
{% for webmention in webmentions %}
-
{% if webmention.author %} {% endif %} {% if webmention.content %} {{ webmention.content }} {% else %} {{ webmention.title }} {% endif %}
{% endfor %}
No webmentions were found.
{% endif %}