Bicycle Trailer
I’m what you might call an avid cyclist. Given the choice, I generally prefer to cycle around, as opposed to taking the car. Of course, a bicycle isn’t ideal for all tasks, in part because of the limited carrying capacity normally available. Fortunately, a bike trailer solves that problem!
I started off the project by looking around for various plans. The following three turned up most frequently:
I quickly eliminated the first design due to the need to weld. Not only is this something I’m neither trained nor equipped to do, but welding EMT, which contains zinc, is a difficult and dangerous prospect (something the original designers probably didn’t know).
The second design is an intriguing one, however I was put off by the weight inherent in the design (it uses angle iron for the main frame) and the fact that the corners of the frame were bolted, which struck me as compromising the integrity of the frame.
Thus, I settled on Mark Rehder’s design, which itself was grabbed from a book called “The Cart Book, with Plans and Projects” by William L. Sullivan. It’s simple, bolt-together design constructed from light-weight EMT makes it relatively cheap and easy to construct.
Now, the one down-side to this design is that it requires a pipe bender. These things are not cheap ($30 for the bender, $20 for the handle), so if you can rent or borrow one, do it. Aside from that, the materials for the frame are quite inexpensive:
- 3 10’x3/4” EMT - $24
- 4 electrical box covers - ~$6
- Bolts/nuts/etc - $15 (that’s really a guess)
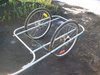
You can see the completed frame below:

The most challenging part was the hitch. The problem is that a hitch needs to allow for near-universal movement. As a result, many hitches on the market are a ball-and-socket design, or something similar. As for me, I decided to makeshift a design using a spring from a storm door kit (which, lucky for me, happened to fit the 3/4” EMT perfectly), as depicted below:
Of course, any hitch made from flexible materials has a couple potential problems:
- Fatigue. I’m hoping the spring will be durable enough that this won’t be a problem.
- Surge.
Now, surge is an interesting problem. Because the hitch is spring-based, when the bike is being accelerated (out of a full stop, or even while regular pedaling), the spring will tend to stretch and contract. My design does have these problems, to some degree, but it’s not so bad as to be unbearable.
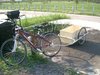
The next step was to build a box. I decided to go with exterior grade plywood and 2x2’s, fastened together with screws. I then placed shelf brackets along the sides and front of the box and drilled holes in the frame, through which bolts are installed, fastened with wing nuts. The final box sits about 8 inches below the main frame, which lowers the center of gravity of the trailer and improves stability. The finished product can be seen below:
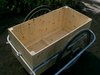
The interior dimensions ended up being roughly 40”x20”x16”.
Oddly, the box ended up being more expensive than the frame. The wood itself ws relatively inexpensive (about $20 for the plywood and 2x2’s), but the hardware (brackets, bolts, and in particular, the wing nuts, which were $1 each) really added up. The final product is quite sturdy, though it is fairly heavy (I’m guessing 12 kgs, give or take).
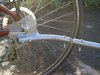
The New Hitch
Well, after riding with the old spring-based hitch a couple times, I got a little concerned that, with a lot of weight, the surge would become a problem. So I went down the path of designing a new hitch.
Now, when riding a bike, consider the X axis to be across your shoulders, the Y axis to be vertical, and the Z axis to be through the length of the bike. A hitch needs to be able to rotate about Y axis, to allow the bike to turn, and the Z axis, to allow the bike to tilt side-to-side. There are a number of ways to design such a hitch:
- Using a flexible material (like my previous spring-based design)
- A ball-and-socket joint. This is probably the ideal solution.
- A universal-joint, which uses a pair of hinges to achieve the necessary flexibility.
Now, for the home builder, the first and last solutions are really the only options. And in my case, I was further hindered by the need to avoid welding. Fortunately, I was able to come up with a design that met those needs, as depicted below:

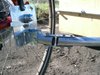
As you can see, I used a small piece of scrap pipe to join a pair of hinges. I placed the Z-axis joint right up against the bike, to provide the best tilt response. In order to create the hinge, I mounted two shelf brackets onto a piece of electrical box cover. The axel is a simple cotter-pin design, which makes the trailer easy to remove.
The Y-axis joint was created using two shelf brackets that I straightened (in actually, I could have bought two already-straight brackets, but my original concept required L-brackets). They were then fixed to the trailer arm with screws and bolts and then attached to the scrap pipe segment using a simple screw and self-locking bolt combination that’s loose enough to allow for rotation.
The final design seems to have much less surge than my previous attempt, and still provides the necessary flexibility.
And, again, I still need to attach that safety strap…