Cybersocks
Toe-up Socks
Instructor Denise Powell

![]()
Lesson One - The Square Toe Cast On
Casting on, the Square Toe method
If you haven't read the Denise's Introduction to the Toe Up sock, this might be a good time. She explains the reasons for making your socks in this fashion, as well as telling you what materials you will need.
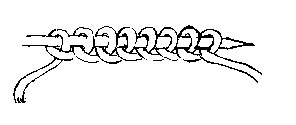
Using the half hitch (simple backward loop ) and the single SMALLER dpn, make 8 loops on the needle. See the diagrams for the first loop and the completed cast on.
If you are working with a sock or fingering weight yarn and making a large sock, you may want to cast on 10 loops.
If you are working with a worsted weight yarn and making small socks, you may want to cast on 6 loops.
 Casting on - first stitch
 And here is how it looks when the cast on is complete.
Using one of your set of dpnís knit across the eight (or whatever) loops on the smaller needle. These stitches will form the top of the foot.
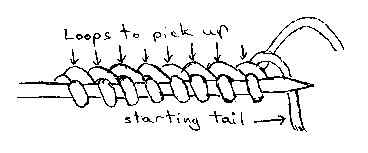
Turn the knitting over so that the bottom of the cast on loops are on top . The tail of yarn from the cast on and the yarn from the ball will both be at the right hand side. Take the cast on tail and move it over top of the yarn from the ball. See the diagram for how it should look.

Taking the smaller dpn again, pick up the rightmost four of the loops as shown in the diagram and knit them using one of the regular dpnís.

Repeat this with the other four loops and a third regular dpn.
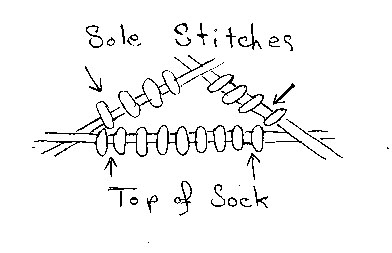
You should now have sixteen stitches on 3 dpnís. You are finished with the smaller dpn, put it away so you wonít be tempted to knit with it! (been there, done that. . .)
If you want to work with a set of five dpnís. transfer four of the stitches from the first needle to another one. You will need to mark the beginning of your round if you do this.
Increases
Now that youíve cast on and knit the first round, itís time to begin the increases.
If you are unsure about how to make the increases, refer to the Preliminary Lesson.
Increases are made:
ē After the first stitch and before the last stitch on needle 1 (the needle with 8 stitches that forms the top of the sock)
ē After the first stitch on needle 2
ē Before the last stitch on needle 3
Donít forget that you need to make the increases symmetrical - use one form of your choice at the start of needle 1 and two and the other at the end of needle 1 and 3
The rate of increase depends on your yarn and what size sock you are making. For my Classic Wool sock, I increased in each of the next two rounds, to a total of 24 stitches. Then I changed the rate of increase to every other round.
The photo shows my socks after the first increase round - there are now 20 stitches.
 Click on the photo to see a larger image. Use your browser's back button to return to this page.
If you are making socks with fine yarn, you may want to continue the every row increase rate for a few more rounds before switching to every other round. If you are making smaller socks with heavier yarn, you may want to increase the next round and then every other round.
Increase until the toe section fits (snugly) on the toe section of the foot it is being knitted for.
My Classic Wool sock was increased to 48 stitches (for a large womanís foot). My Koigu premium merino sock increased to 72 stitches. - same foot, much finer yarn!
If you want to knit a plain foot (or you know what design you will use on the instep), you can continue knitting around until the sock fits on your foot almost to the front of the ankle.
I used a little twist stitch rib on the stitches for the top of the foot. it will be continued up the leg after the heel is complete. If you want to use this stitch,
it is (for 24 stitches on the top needle):
First Round: k1, *p2, right twist 2, repeat from *, ending p2, k1
Second Round: k1, *p2, k2, repeat from *, ending p2, k1
![]()
